Showing posts with label Roses. Show all posts

Expanding and snowing?

>> Monday, October 5, 2009

It’s snowing! Well, not real snowball, snowman, digging the car out, skiing type snowing. But it’s only October 5, for goodness sake.

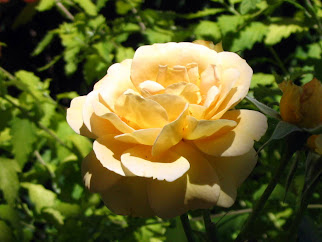
I’m in the middle of expanding one of my beds to make room for a beautiful yellow rose bush one of my daughters is growing tired of. How can you grow tired of roses?

Oh well, her loss, my gain.

It’s going to be a bit out of place for awhile because the area I’m putting it in is full of drought tolerant plants. It won’t stay there for more than a year or maybe two until I get its permanent spot prepared in the front yard. That’s going to be a major undertaking.


Speaking of loss and gain, is there nothing sadder than a tomato plant that has been struck down by frost?


Well, maybe a pepper plant.


Oh well, now it's off to plan next years garden.

Read more...

Rose bloomed!

>> Monday, May 21, 2007

This is pretty exiting because this rose was 'rescued' from a mistake I made awhile back. It is a 'Honey Perfume' Jackson & Perkins 2004 Floribunda of the Year and this is how it looked the first season after I planted it in 2005.

I planted it the same day as I planted the 'Tuscan Sun' Jackson & Perkins 2005 Floribunda of the Year.


They were both planted in a south facing position against two different buildings, in similar soil. I'm not 100% certain why they turned out so differently but the 'Honey Perfume' was not doing as well as the Tuscan Sun. As you can see the bush only put out two roses and it only grew to just under two feet tall. The Tuscan Sun put out many roses and grew to over three feet tall. This is all in the first year. So I decided to move it next to the 'Tuscan Sun' this spring.

Here are pictures of each one as of this month. This is the Tuscan Sun.

This is the Honey Perfume.

The picture quality is not the best, I really need to learn how to use this camera.

But the difference in size can be easily seen. I have fed and cared for them both in the exact same way, it is just difficult to imagine what went wrong with the Honey Perfume. It bloomed in its original location (only two blooms) while the Tuscan Sun had many. It must be something to do with the soil.

I moved into this house four years ago, and therefore I cannot know what was in the soil before I planted these roses. Hopefully, I got it out in time to save it.

I know some of you are thinking 'get a soil test' and I know I should. I did a home test with one of those home kits and the pH is nearly identical, as far as I can tell. I guess I should talk myself into just getting a real test done.

Read more...

One transplant at a time

>> Sunday, April 22, 2007

I love gardening, but my love is tested daily as I attempt to turn these lawn-filled, clay plots into flower-supporting, food-producing, horizontal compost piles. When we moved into this house, several years ago, there were four rose bushes (in sad shape), five evergreen shrubs (dying), five fruit trees (apple, cherry, peach, pear, plum, all in desperate need of pruning), a catalpa tree and a dogwood tree both in need of pruning. And all in desperate need of fertilizer. There was not one bit of mulch to be seen and the soil was hard-brick clay. Talk about your gardening challenge! The joy of having a clean slate to start with was not to be found here. I was faced with first getting what I had cleaned up and healthy before I could consider starting anything new.

I had never gardened in clay before, I had never grown roses or fruit trees either so I began reading, listening to garden talk shows on radio and television and visiting the many garden centers and nurseries surrounding me. I also visited the wonderful public gardens to see what grows here. Thankfully, the knowledge base concerning plants and landscaping has expanded greatly thanks to the internet and the ability to blog. All of the wonderful people who have given advice can only be summed up as golden. Thank-you all very much for sharing your pictures and advice. I wish I could thank each of you by name but given that I can't possibly remember all of you, I have tried to list as many as I can on my blogroll. The sum total of all of this knowledge I have gathered has given me the confidence to expand my gardening abilities and grow with my gardens. And now I want to share my mistakes and successes with all of you in hopes that some new gardener might learn and gain the confidence to start their own gardens.

While attempting to nurse everything back from the throes of death I immersed myself in the fantasy of drawing up plans. Many of you know what I mean, I was filled with the excitement of planning new and glorious flower beds and life-sustaining vegetable plots and sensuous herb gardens. Well, in the meantime, I had to learn what to do to get the clay soil into some usable state. So my hands were full and my ideas were flowing. I love learning new things!

I spent the first full year observing how everything grew here, where the sun and shade fell and taking note of different views from each window in the house. This was essential in order to determine where best to place all of the planned plants and hardscape I was planning. Many plans and bed designs have changed from the originals or should I say I have 'adjusted' them to better fit the reality of a budget and available space. To be modestly honest, my inadequacies and enthusiasm needed to be trimmed a bit.


The second year we added a deck to the back of the house and this provided at least two new corners and ideas for beds, one a shade garden, the other an herb garden.
At this time I began removing lawn to make five beds and began adding as much compost as we could afford. I also began covering the areas with small bark knowing it would help keep the soil cool in the hot summers that is part of Utah living. I was trying to get worms to come up closer to the surface so they could help loosen the soil. I couldn’t resist the urge to add some plantings so I put in a couple of Irises (which are one my favorite flowers), a Plumbago, and a clematis. All of which died by the next year. The clay was still too much for them to survive in. The lesson of patience had been taught and learned so it wasn't a total bust.


Two of the existing rose shrubs had to come out. They were not able to be saved, unfortunately, the other two are now blooming with beautiful red roses and, of course, the not so beautiful typical black-spot, powdery mildew and aphids. But these are getting less and less common because they are slowly getting under control.

The evergreens all had to come out. Neither my wife nor I cared for where they were planted nor did we care to have them in the yard, besides the fact they were mostly brown and not worth the trouble of saving. Sorry evergreen lovers, I just could not do it. Besides, removing them opened up two planned beds.

That Fall I began putting bulbs everywhere, mainly Tulips, Daffodils and Hyacinths and the following Spring they all brought much needed color to the otherwise drab landscape. The soil was beginning to loosen up but still needed more work. So, in went more compost and mulch and the worms were beginning to show up for work and have helped greatly.

One major enemy I have to deal with through all of this, and the prospects are good that I will be dealing with this for a very long time, is field bindweed. If you don’t have to fight this very prolific weed then you are indeed a lucky gardener. Not that there aren’t many other weeds to deal with, but this one has roots that can travel thirty feet! When you pull them they break off easily and come up again. If you don’t throw away what you did manage to pull up (in the trash can, not the compost pile!) they will sprout and start anew. If you till and break them each into ten separate pieces they will grow ten separate new plants. Whole articles have been written on just how to kill these things. Some articles say you will never completely get rid of it. Others offer more hope but lean more towards just surviving with it as opposed to completely eradicating it. To control it is basically a matter of timing. The only time spraying is effective is during Summer when they flower and on into the Fall as they store energy to make it through Winter. Glysophate (there are over 200 name brands that use this as their main ingredient, with the most notable being Round-Up) is probably the safest for humans. The smallest drop of it will kill any plant. So extreme caution is advised. But it breaks down within seven days of use and when it hits the soil it becomes inert. So, all in all not bad for an herbicide.


One local Master Gardener I heard of feeds the plant into plastic bottles without breaking them off and allows them to grow there. In June, as they begin flowering, he cuts the bottom of the bottle open and sprays Glysophate on them until they are completely soaked. This is the time of year they take the Glysophate down into the roots and die. They are so prolific that he will be doing this every year, but at least there is some hope of getting it under control. Of course, you can always count on neighbors who don’t garden and don’t care if it survives in their yards. This means that it will always come back.


This year, in January, I decided to buy one of those ‘complete’ gardens you see in catalogs to put in one of my full-sun beds. It is a butterfly/hummingbird garden. So when Spring came around I covered the bed with composted steer manure and more compost and an all-purpose fertilizer and then tilled it all in. When the plants arrived about a month later the plot was fairly easy to dig and so I planted all 51 plants. This planting took place just three days ago and the weather has been pretty much perfect for it. 50s to 60s daytime and down into upper 30s to lower 40s at night. Occasional rain. Mostly overcast.

I am keeping my fingers crossed and getting the irrigation system prepared because I think this Summer is going to be hotter and dryer than usual. Our snow pack in the Wasatch Mountains is below normal so water will definitely become a problem towards the end of Summer.

I love life, and gardening is such a wonderful expression of ‘love of life’. When we can spread hope in this way it shows that we are doing more than just taking up space on this planet.

So, I hope you join me in my journey deeper into gardening as I try to tame the clay and beautify our world one transplant at a time.

Read more...

New growth is everywhere

>> Monday, April 2, 2007

Spring is really beginning to speed up. With the warmer temperatures, freaky as it may be, everything is beginning to green up. We can expect a few more frost days and I hope nothing gets killed by it but for now I'll take the welcome reprieve from winter's harshness.

The rose leaves are dark red and about an inch long,

the Hyacinth is open and fragrant,


Early Stardrift bulbs are open and bright white in their shady spot next to the front steps,


and the forsythia is a beautiful glowing yellow on long, graceful branches.


Today, I doused the few bindweed plants I could find with Round-up. Even though I know it won't make a dent in their numbers that will come next month, it is still satisfying to kill off a few when I can. There is about 10 plants sending up their first leaves. Some of the weeds have three and four sets of leaves already. Hopefully, the leaves will take the spray down to their roots and stop their growth. One can only hope.

Here’s what I know about Roundup, it's only present in the soil for 7-10 days (then you can replant the area), and you only need to worry about keeping your children and pets away while the foliage is still wet after application. The temps need to warm up, to at least 60F, and the plants need to be actively growing for it to be effective. It's only absorbed through the leaves (not the roots), so is safe to use at the base of trees, etc

I pulled the mulch away from the roses to allow the soil to warm up and to dry out a bit.

I trimmed a few low branches from the Dogwood tree and Catalpa tree so I don't get dinged any more when I cut the lawn.

The Starlings are watching me from afar because the suet feeder is in the Dogwood tree and they are usually all over it this time of day.

Next, I plan on putting fertilizer down in the brown spot in the back lawn and then sprinkle some grass seed over the area, and then sprinkle it good with water. I think I will cover the area with some newspaper to help it stay moist. New grass should be up in a few days and by the end of two weeks the area will be turning green.

I went to a bulletin board to see what was going on around the country as far as gardening and saw these problems/questions.
'Dirty fingers' in Northern California said they have aphids on their Iris in their pond. They have Iris already?
'Chryse' suggested using soapy water, away from the pond. That’s a good idea, on both counts.
'Jason T' of Houston wrote to say that large red boils are popping up on his oak tree.
Several people wrote to tell him that this is caused by scale. I never realized that scale would have this affect on trees. He included pictures and it really surprised me to see this. He actually chose to pick them off and squash them! This seems to me to leave open wounds in the tree that may not be very healthy.

'Joey MacDougall' of Florida wrote in to say that his/her Gardenias have a black sooty mold on them.
'AuntBee' wrote in with an article stating it is caused by scale. Here is the link: http://lee.ifas.ufl.edu/horticulturearchive/sootymoldongardenia.htm
'Dane79' of Washington says he/she has a problem with morning glory (bindweed) and tried everything to get rid of it. Everyone suggests Roundup repeatedly and lots of patience. Don't I know this to be true!)

Read more...

More plants arriving

>> Friday, March 23, 2007

Received three Dianthus 'Zing rose' (3) and Echinacea 'Magnus' (3).

The Dianthus worries me a bit. I think that this hot dry climate might prove to be a bit too much for these delicate plants. I have seen them in containers around the neighborhood, but I'm putting them in one of the perennial beds in the front yard. Hopefully, with the improved soil texture they will keep watered well enough.


The Echinacea can take dry spells quite easily so it will go where I took the Rose 'Honey Perfume' from in the back yard by the shed.


The Forsythia is blooming! Beautiful yellow leaves on long arching branches.

Read more...

Pruned roses

>> Thursday, March 15, 2007

Gave the roses their annual Spring pruning. I always look forward to this part of Rose maintenance with trepidation. First of all, I know that it is necessary for their health but I am still such a rookie that it just seems I am killing them when I trim them back as harsh as what is recommended. Secondly, I have seen what incorrect pruning can do to rose bushes and it isn't pretty!

In speaking with the neighbors I learned that the bushes had not been pruned for the last several years before we moved in, (the family was going through their own personal turmoil which I won't get into here) just suffice it to say the roses took a back seat for a couple of years.

Having pruned them now for a couple of years and seeing that they are still growing I guess I’m doing okay by them. It’s difficult to follow a book for instruction because I don’t have the perfectly shaped rose bushes to start with. I just cut off all of the winter damage and don’t worry too much about creating show quality shrubs.

When we moved into this house in the Summer of 2004 there were four Roses, I don't know for certain what kind, my guess is they are floribundas, but shrubs anyway, not climbers, with lots of small, deep red flowers. They looked really sad. Anyone could see that something had to be done to save them. They are planted in full sun (which is good), too close to the house (which is bad due to lack of air circulation), without any mulch (which is bad due to loss of water in Summer months), in hard clay (which is amazing they have survived!)

The flower color is beautiful, (this hto was taken last year). Aphids had misshapen the flowers petals, there were spots on the leaves, which I have learned is black-spot and some grayish powder which I learned is powdery mildew. All of these three problems have detracted greatly from the overall beauty of the bushes. So, not only was I faced with learning how to start dead heading them properly, I was now faced with having to learn how to stop these three very common maladies of Roses. The internet is a wonderful tool for these two purposes as well the public library.

That first summer my wife and I decided that two of the four bushes were just too far damaged to save and we were afraid that in keeping them we would be jeopardizing the healthiness of the other two. They were all planted within a 100 sq ft plot. We pulled those two out and began to nurse the other two back to health. I knew my first course of action was to get some mulch on the ground to help keep the roots cool. After dumping some small bark mulch and spreading it to about three inches deep (being careful to keep it away from the main stems) I began reading up on the control of aphids. That part was pretty easy, just spray the bushes with a hard stream of water but I read that insecticidal soap works well and thought that they might need this because they have had such a big head start in building up their colonies.

Next, I began reading up on pruning and controlling diseases of roses. The first thing I was surprised to learn was that the way you dead head determines how a rose bush blossoms. I thought this was predetermined by the type of rose you have. I don't know about most people but I really don't have a huge preference towards fewer, large flowers or more, smaller flowers and since these had not been dead headed by the previous owner these bushes produced a lot of smaller flowers. Plus, since they had not been well-cared for, I was also surprised that they had so many flowers!

Two years ago, Spring 2005, was the first time I had the opportunity to put what I had been reading on pruning to the test and I must confess I was afraid to cut them back as hard as they really needed. We began using Safer Soap whenever we saw aphids, we were careful to water them only in the morning, dead head them as soon as the flowers were fading and added as much compost as we could to help break up the clay.

We were confident enough that we were doing everything right that we bought two more floribunda roses to replace the two that we threw away. We went with Jackson and Perkins 'Tuscan Sun' and 'Honey Perfume'.

Tuscan Sun


Honey Perfume


In the Spring of 2006, we pruned the two older roses a lot harder than we did in Spring 2005 and I was astonished at how quickly they grew back and at how much fuller they looked. Within one month, there are a lot of leaves and new branches.

The two new roses were not to be pruned the first year so we just let them go. The aphids don't even get a chance to get fat any more because we spray those bad characters off as soon as we see them. We stopped using the insecticidal soap, we just spray the bushes with a hard stream of water and use Bayer Advanced 2-in-1 Rose and Flower Care Granules.

I learned that feeding them well and at the correct time works wonders in controlling black-spot I also add Epsom Salt to get the leaves shiny. We spray the plants regularly with a milk-based spray to control the powdery mildew. And, I'm sure that the regular application of clay busting compost has had a lot to do with their overall health. After all of this routine care we were rewarded with flowers even more beautiful than we had imagined.

But something was wrong with the 'Honey Perfume'. It was planted the same day as the 'Tuscan Sun' but on the South side of the shed in the back yard instead of the South side of the house in the front yard. To me, the sitings were identical so there must have been something else going on. It bloomed nicely, at first, but towards the end of the summer the blooms were not looking as good as they should have. I can't figure out what it is but I decided to move it to the South side of the house with the other three roses before it just dies off. Hopefully I am doing the right thing because leaving it there is definitely not the right thing. So, I have to wait and see and keep my fingers crossed. It looks really quite sad. There are three gray sticks reaching up to about one foot tall and there are holes in the center of each stem. I learned that Rose Cane Borers could have created the holes. I put Elmer's Glue over the holes hoping this is the right thing to do. I don't know if they over-wintered there (maybe putting the glue on will suffocate them) or if they ate all of the life out of the plant and moved on already. But one important thing I have learned about nature is to never give up! I have seen plants come back from sticks before and I'm not as ready to give up on these sticks as I was three years ago with two of the original roses at this house.

Read more...

Today's theme is soil improvement

>> Wednesday, March 7, 2007

With clay soil, this theme will be repeated over and over, every year, for a very long time.

First, the easy part, I plan on starting a routine spreading of Nutri-Mulch into every bed. This is actually Turkey manure. Utah has a very large number of Turkey farms about 50 miles south of where I live. I like buying locally so this works out real well. the NPK rating is 1.75-1.0-1.25 and it is loaded with trace minerals that all plants need.


I'm starting with the four raised beds, which measure 4' by 4' and are 10" deep so I'll add about 1 cu ft each and mix in well.
I built these beds in March 2005 for vegetables. The soil stayed loose over the winter without being covered and is very nice and workable. I'm thinking of making row covers and a cold frame to extend the season in spring and into winter.

The perennial beds pose a different challenge. I spread Nutri-mulch into the front two beds, F1 (100 sq ft) and F3 (64 sq ft), as well as one of the three in the backyard, B3 (262 sq ft), about 2 cu ft. The beds still need much more but this all I have on hand.


The large Wood Hyacinths are beginning to come up. I put these in last Fall and it is a welcome site for something to start showing.


I moved the floribunda Rose 'Honey Perfume' from its place in the backyard, in front of the shed, to a similar location in the front yard in front of the house.


I had planted this rose, in the backyard, the same day I planted the floribunda Rose 'Tuscan Sun', in the front yard but the 'Honey Perfume' did not like its home nearly as well. I think maybe the micro climate it was a little drier in front of the shed even though both locations are south facing, against vinyl siding and get full sun.

I probably need to incorporate a little more organic matter to the bed in front of the shed. There's that mantra again, 'more organic matter'. You can never have too much!


Tore out the Salvia Plumosa from the front perennial bed in F3 and threw it away. This photo was taken last July. By the end of the year it had gotten ratty looking and not very healthy. I liked it at first but I don't think I could give it enough room to spread like it wants to do.

Read more...

First entry

>> Monday, March 5, 2007

Temperature went a little crazy today, started at 6:00 AM at 45F and then slowly dropped to 36F as the day progressed and is predicted to be even lower, into the 20's by tonight.
Found Box Elder bugs crawling around the back shed so I sprinkled a little Carbaryl just inside the shed door, trying to keep them out.
I started prepping the garden for this years plantings by dumping some Nutri-Mulch over the Rose bed at the front of the house. It is supposed to help break-up the clay.

Read more...

© 2007 -2011 - Utah Valley Gardens - All photos and content copyrighted by Utah Valley Gardens unless otherwise attributed. The use of photographs posted on this site without permission is forbidden and is protected by copyright law, as is all original text.

Blogger templates made by AllBlogTools.com

Back to TOP